"The objective of life is not to be on the side of the majority, but to escape and find oneself in the lines of the madmen." - Marcus Aurelius

11/27/10

Making the Winterfresh Coat

Okay, so I lied. I was going to do different pockets, aaaaand that didn't happen. Why mess with a good thing, right? But I did add the hood! But we'll get to that in a minute.

Firstly, my inspiration: a lolita coat I bought back when I was first getting into the fashion. It's adorable, but it has so many things going on, it's sometimes difficult to wear. Also, looking at some parts, I thought to myself, "Man. I could do better." Anyway, this is the only picture I have of it, from last March.

So I used Butterick 5425 for my jacket. I picked up this really dark green wool blend from the Hancock's near home (since there wasn't enough in the one near my college/dorms) and some itty bitty white lace to use as accents. Any other lace I used was lace I already had (and isn't that the weirdest sentence I've ever typed). Also, lining and interfacing. But I was a silly penguin and bought sew-in interfacing instead of fusible. This actually works out better in the long run, because if I had to get my coat dry-cleaned, the heat from cleaning every so often might mess it up. So! Since I'm silly, I had to go in and sew all of my interfacing in, which, you know, whatever.

And the lace! I usually pin it to the front side panels, and then sew those to the front panel(s).

close-up on the lace
So it comes out looking like this:
And then I decided to magic up a hood. I don't have a pattern for hoods, so I took a hoodie out of my closet and messed around, trying to get a good grasp on what shape to cut out. And then, because I'm silly and a dork, I added a point :3 And then lined it with fur.

The nice thing about fur? You don't have to hem it. Just go around the edges and kind of... tug, I guess, to make sure none of it will come off from where you cut it. Back to the jacket! I didn't have enough lining left over to make the pockets out of that, but I certainly had enough wool. And I figure that'll just keep my hands warmer, and I certainly don't have a problem with that. So you attach these bad boys at the side seams.
It's at this point that I realize this is a lot of fabric. And it is wool, which is heavy. I'm grateful I decided to make this at home, where we have a decent-sized kitchen table, and not my dorm, where it would inevitably need to be spread out on the floor.

And then, there is the lining.
Granted, my life would have been easier if I had decided to iron it or somehow get the wrinkles out, but my point still stands that lining is a terrible, evil fabric straight out of hell. Unless I am paid rather well and can run screaming and crying through the house without being judged, I do not want to work with this stuff again. Because, trust me, I cried over this lining. I wanted to bash my head in and call it quits and strangle small children and kick puppies. But I persevered! Also, change of fabric requires change in needles. I could use the heavier needle for this, but really? That's how needles get broked. I know this, so I don't push it anymore.

So, after some strange flipping around and attaching lining to coat, it was time to add the collar. I decided on a permanent hood, and that was my first problem. I managed to get the back part or the collar + hood attached to the neckline, but then the needle refused to go through the rest when I tried to put it all together, and cracked, and then broke. So I had to do that by hand, which hello, super-thick fabric what was I thinking dear God, but I am ever so thankful for large, curved needles :3
Then I attached the sleeves! And so, after the first full day of sewing, this is what I had:
Then, there was lining the sleeves and slipstitching, buttons and buttonholes and figuring out what French tacks were (and I still don't think I did it right, but whatever I did got the job done), hemming (and this is seriously the worst hemming job I've ever done since I started sewing), added some lace around the bottom, and then finally some around the cuffs.

And this is what you get :3


Sorry for the image-heavy, but! Totally worth it.

11/22/10

Winter Coat

So my next project is a coat. I'll be using Butterick pattern 5425, and just looking at the directions for this thing make me want to kill myself. But I said I'd do it, and it's going to be the most beautiful winter coat you've ever seen. EVER. I can already tell you I'm altering the pattern a little (like I always seem to do), in that I'm not including insertive pockets - rather, mine will be on the outside. Much easier that way, I think. I'll also be adding a hood. I want to do it so I can button it on or take it off, depending on how I feel like wearing it, but I don't want whatever buttons I use to look tacky sitting on the collar when the hood's not there. And of course, there will be decorative things.

I will try to take pictures along the way, but I can't promise anything. This is going to take me long enough as it is. On a side note: I think it's hilarious that, although neither of us knew what projects we were going to be doing this Thanksgiving break, both Salmon and I are working on our coats at roughly the same time and speed. So hopefully we'll get back from break and get to go on a photoshoot adventure again! And be awesome jacket buddies together. We seriously need to start a club.

11/18/10

Dead Man Hoodie

So Salmon and I bounce ideas off each other. This is nothing new. She's the one who got me started on painting hoodies, after all. And so here comes another one! This one, like the Gallahad shirt, is based on {...} from Hanna is Not A Boy's Name. So first you need materials:

For me, that means that black hoodie I've been meaning to find something to do with, and fabric paint. White definitely, but I couldn't decide between the neon and the regular green. I have no idea what the difference is between matte and velveteen, so whatever. I tried the neon first, because it's closer to the color I wanted, but it has this weird gold sparkly to it and it doesn't layer well, so I ended up mixing colors to get what I wanted. Oh, and brushes! A word to the wise: you won't be able to use the brushes you use with fabric paint with any other paint. I mean, you could, but they're permanently at least a little fudged up. They never clean up like acrylics, and the bristles go all wonky.

First step was the autopsy scar, because let's face it: they're awesome. And {...} totally has one. You know he does. We see peeks of it beneath his collar all the time. So there's the basic Y shape, with some stitches. Because I know myself, and I know I'm messy, I covered the zipper with tape before I started painting. Good thing, too.

At the end of the first chapter, Adelaide takes {...}'s right arm off just above the elbow, and Hanna sews it back on. So that's what's on the right arm! But, you know, all the way around.

And then I needed something for the back. But what? Besides the orange shirt, stitches and a paper crane, what is really iconic of {...}? And then it hit me. Near the middle of the second chapter, {...} gets posessed by Lee's ghost, and when Hanna tells Lee to GTFO, Lee asks Hanna:
So, ladies and gents, the back:
The last part is a little off center, but whatever. I love it, and that's what counts. And lastly (and this is what started the whole idea) is the cross with wings. Hanna and {...} are partners in Hanna's paranormal investigating business, so it only makes sense that I make some sort of icon to commemorate that. And so I did:

And there you have the Dead Man hoodie! More pictures to come once I bribe my brothers into taking them for me :3

Gallahad Shirt

So, as you can probably tell, I love Hanna is Not A Boy's Name. I should probably make a tag for that. Moving on!

This guy's name is... well, he doesn't remember. He's been dead for about a decade, give him a break. So Hanna makes up names for him - it's a new one every day with this guy, seriously! But we love it. The one that's stuck in fannon the most is Gallahad - but with only one "l". I just like the way it looks with two better. Anyway, that orange shirt is pretty distinctive, hey? And you can't go out and find orange shirts just anywhere. So I made my own. This is the last button-down I ever make, until I inevitably make the next one.
I always make the worst faces when I'm getting my picture taken >:( So this is pretty obviously a fem-version of zombie's shirt, but it's got everything! ...Plus some pompous cuffs. I was having a bad day, and ridiculously over-sized cuffs made me feel better, so there they are. I used the Simplicity Threads pattern 3684 (the same one I used for the bib-ed lolita shirt, but without the bib option). I kind of made up the cuffs without a pattern, and guys. YOU GUYS. I was literally down to SCRAPS trying to get all the pieces for this pattern. Also, I said when I made the lolita shirt that I would make that collar part smaller (because, believe it or not, it's actually included in this type of collared shirt too). I didn't this time, and it's kind of strange, but the collar is HUGE, and I kind of like it. And the black tie is purchased. I am not that awesome.
 So naturally, I went outside to the courtyard with a friend and we took pictures.
And there you have it!

11/17/10

Don't forget your bib

In my never-ending search for lolita things, I realized I didn't have any lolita shirts. This isn't a huge problem, since I prefer the one-piece dresses anyway, but I thought it might be nice to have. I also want to make a dress like this:
That white part of the dress is called a "bib", and there are shirts (usually retro) that include this part. So I went searching for a pattern, figuring I could make a shirt with this detail for practice, and came up with Simplicity Threads pattern 3684, which is a bunch of button-down blouses. I went completely with the pattern for a short sleeve, bib-ed blouse, minus interfacing because I hate dealing with that shit (and all I have is iron-on anyway). I messed up the bib a bit, and the sleeves because I couldn't for the life of me remember what "ease the sleeves" meant. But here it is:

The only thing I would change on this pattern is the collar (make it smaller), and the bib (make it end on or above the bust line instead of below). And I don't like doing button holes, just in case you don't already know. Especially if you don't have one of those fancy things that knows what length it should be and does it for you. It's times like these I despise having a sewing machine as old as I do.

Halloween Lolita

Continuing in my quest to own lolita clothing, I decided to try out this tutorial I found on Livejournal for how to make an overskirt. It ties in the back sort of like an apron, so I'm not really sure what to call it. Regardless, this was around Halloween time, so I went with my Halloween fabric (which = orange with spiders). The only thing I changed in the tutorial was that I didn't cut the main part of my skirt into 3 sections and then sew them together; I had enough fabric to just cut one long strip and be done with it! It is possible, trust me. I was also getting low on black fabric, so the ties at the back aren't long enough, and I made the waistband too long, but these are semantics, and I am perfectly fine with my Halloween overskirt and more than fine with the tutorial. Seriously, the girl who made the tutorial usually has really great, comprehensive tutorials for a bunch of lolita clothing, so you'll probably see her referenced here again.

But on to what you really want to see:

I was also sneaky and added a pocket to the front of the skirt, because no one ever thinks about pockets when they're making lolita things :3 See if you can find it. Also, as I'm sure you can see, this doesn't necessarily have to be worn as part of a lolita outfit. That first picture? So far from lolita, I have no idea what it is. But I enjoyed wearing it to classes :3

Adelaide-Inspired Hoodie

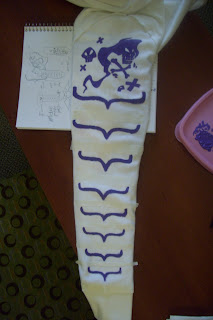
Not to be confused with Adelaide's actual hoodie. C'mon, guys, she's like my favorite character. And for anyone who doesn't know, she's from Hanna is Not a Boy's Name. So I decided on a white hoodie and purple Tulip Matte fabric paint. I was inspired by Salmon's hoodie, and I love mine, but I should really know by now that simple is best. I always try to cram in too many details, and the end result is just... bleh. But the first thing I decided on was a big X over one of my breasts, based on when Adelaide turns back into a human in this frame:
And then, looking at the t-shirt design (from the t-shirt Salmon actually owns), I really liked this one part that's suppose to represent Adelaide here:
And so I designed the sleeve, and it is honestly my favorite part. I really should have stopped there, but I am me, and I do overboard extremely well.
This is the full sleeve, but in-progress, as you can probably tell from the tape. And my sketch in my sketchbook underneath it. Close-up:
Anyway, then I decided on this... thing on the back, that would have been awesome had I not messed up one of the bat wings so badly (read: made one bigger than the other). And yet I still like it.


And you can see all the strange little details I added in addition to the main parts. I will admit, some of them were me covertly hiding up paint smudges that were never meant to be there. My point still stands.

So! There's my Adelaide-inspired hoodie. Thanks for that, Salmon.

Blue

This could technically be a lolita skirt/dress thing, but it doesn't have to be. Either way, I love blue; it's my favorite color, and I have it on high authority that I look good in the darker shades. So I picked out the fabric and said "Hey! Let's make a skirt."

I actually used a pattern for this one (McCall's 5811), but, since nothing ever fits my hips like it's suppose to, the opening for the waist was too small. But I was not to be deterred! I simply made it an empire-waist skirt instead. I made the waistband extra-wide, and I really should have used a longer zipper (read: 9" instead of 7") since I was making the waist so much longer, but that's what you get when you don't think these things through. At the bottom of the skirt is a band of ruffles, and let me tell you something about ruffles. I love them, but they are a hassle. Every time I sit down to make something that includes ruffles, I wonder why, if I hate doing them so much, I continue to make things with ruffles. The answer is simply: they look pretty.
Paired with a blue button-down, this outfit was amazing. I wore a petticoat, bloomers and tights underneath, although the petticoat was honestly unnecessary. It made it's first appearance at the High Museum of Art on college night when the Dali exhibit was there. I got so many complements from strangers! Proof that I can make pretty things, right here. But now to the important part.


:D Salmon and I got our pictures taken while we were there! Look out boys, we're going professional. In case you're wondering where you've seen that hoodie before, it's over on Salmon's blog. :3 We are terrible, terrible influences on each other. And don't worry, all the hoodies she's inspired me to paint on are soon to come.
Unicorns and Rainbows, Oh My!

After Dragon*Con, the first thing I did was make this shirt I'd been meaning to since my mother had her surgery in July. Ladies and gentlemen, I present to you, the Unicorn Shirt, first worn when Jamie and Adam (the Mythbusters, yes, the very same) showed up at my college to do a Q&A session, where I asked Jamie how many berets he owns. The answer was about half a dozen.
The reason I say unicorns and RAINBOWS is this:
Hint: there are rainbows
And I used Simplicity pattern 2364 to make it :)

The Scarlet Witch

One of my favorite characters of all time is the Scarlet Witch from the Marvel universe. Her real name is Wanda Maximoff, sister to Pietro (or Quicksilver), and daughter of Magneto. At least one of those names should sound familiar to you. She's one of the original Avengers, and she originally had the power to manipulate possibilities, which was later explained as chaos magic, and which now has developed into the ability to warp reality to her every whim, which caused a fine fiasco in the form of House of M.

Wanda's outfit has some variations, and this is Marvel, so you have to deal with alternate reality versions of everything on top of that. Knowing this, I wanted to go with her classical, older look, but without the pink bodysuit (just the tights), because no. And that classical look is what she's shown wearing in Children's Crusade, anyway :3
Old-school Wanda

New-school Wanda
I don't even want to go into how much research I did the cape just to get it to fall right. Suffice to say: pleat, don't ruffle, capes. It looks better that way. I decided on a cowl neck, but no. I know better now. The headpiece was made out of red vinyl fabric (it's just one piece, cut out at once) with black elastic around the back.
This was before the elastic, so I'm just holding to my head, lol
I really liked the shorter gloves better, but I ended up going with opera-length, because they're easier to find. I tried making the ones I wanted SO MANY TIMES, but the universe, it seems, hated me. The boots are standard red superhero boots that I bought off eBay. I didn't have the time to figure out a strapless bustier/leotard thing, so I bought a bathing suit (which I didn't initially realize had an embossed pattern all over it, thanks eBay) and took it in between the breast a bit to get that look (you know that look). And so here it is, in all it's glory:

Pictures were taken Halloween weekend, since I'm an idiot and only wore it for 2 or 3 hours that Monday of Dragon*Con, and didn't get anyone to take a picture of me with my camera. And I am definitely waiting for another costume to come along that can utilize these boots.